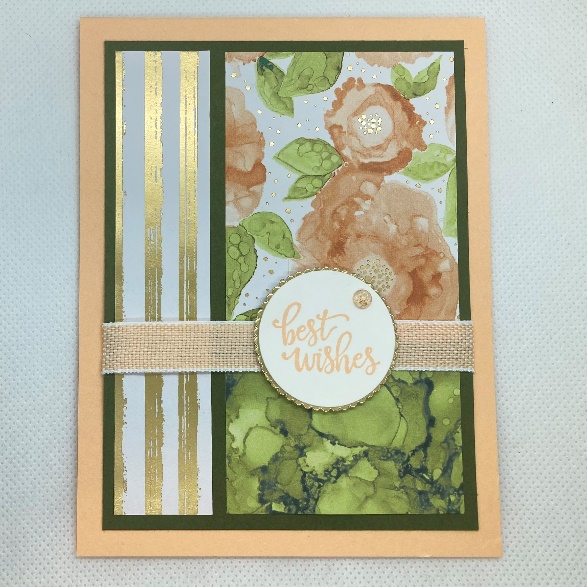
Stampin’ Up! designer series paper is really useful when making quick cards. All you need to do is cut some to size and arrange in panels and you have a card that’s ready to for a sentiment!
Supplies
Stamp Set(s):
Artistically Inked (154542)
Card Stock:
Pale Papaya (155668), Mossy Meadow (133676), Basic White (159276), and Gold Foil (132622)
Designer Series Paper:
You’re a Peach (155686)
Stamp Pad(s) and Ink(s):
Pale Papaya (155670)
Dies and Embossing Folder(s):
Layering Circles (151770)
Embellishments:
Pale Papaya and White Ribbon (155816), Genial Gems (155500), Dimensionals (104430)
Tools:
Stampin’ Cut and Emboss Machine (150613)
Measurements:
Pale Papaya card stock – 4 ¼” x 11”, score at 5 ½”
Mossy Meadow card stock – 3 ¾” x 5”
Basic White card stock – 4” x 5 ¼”
You’re a Peach Designer Series Paper – 3 pieces total – 1” x 4 ¾”, 2 3/8” x 3”, and 1 ½” x 2 3/8”
Basics White card stock scrap for sentiment
Gold Foil scraps
Pale Papaya and White Ribbon – 5 ½”
Instructions:
Fold Pale Papaya card stock along score line and burnish with bone folder. Set aside.
Adhere the Designer Paper on Mossy Meadow cardstock. I like to place it before I add adhesive so I know how to line it up. You want to have an even border around the edges with the same amount of space between the long piece and the two smaller pieces. You will have a slightly larger gap between the two smaller pieces, which is ok. It will be covered by the ribbon.
Wrap the Pale Papaya ribbon around the Mossy Meadow layer you just created, adhering the ends to the back with adhesive. Attach this piece to the Pale Papaya card base.
Stamp your sentiment onto a piece of Basic White card stock using Pale Papaya ink. Cut your sentiment out using the second smallest circle from the Layering Circles dies (it measures approximately 1 3/8” in diameter).
Using the second smallest scalloped circle (measures approximately 1 ½” in diameter) and the Gold Foil, die cut a scalloped circle.
Adhere the sentiment to the Gold Foil using adhesive. Use Dimensionals to attach this to your card front.
To finish the front of your card, add a Genial Gem to the sentiment.
Optional – using the smallest flower and the dots from the Artistically Inked stamp set, decorate the inside of your card on the Basic White card stock. Adhere to inside of card.

If you like this card design, take a look at the card I made recently using the Sweet Symmetry designer series paper.

January’s host code is DC7R2ER3
Have at least a $50 order and use the host code and I will sent you a FREE product.
Have over a $150 order. Do not use the host code and pick out some FREE product for yourself.
Place an order in January and get 10 FREE card tutorials emailed to you

Leave a Reply